Restoring a Chevy 67-72 Truck: A Step-by-Step Guide

Step-by-Step Transformation: Restoring a Chevy 67-72 Truck into a Classic Beauty
Restoring a Chevy 67-72 truck is a captivating endeavor that allows truck enthusiasts to revive the timeless beauty and iconic presence of these classic vehicles.
With their distinctive design and unmatched charm, these trucks hold a special place in the hearts of automotive enthusiasts.
From the moment you find the perfect truck to the final touches and fine-tuning, the restoration process is a labor of love that requires meticulous attention to detail and a deep appreciation for craftsmanship.
In this comprehensive step-by-step guide, we will delve into the journey of restoring a Chevy 67-72 truck, providing you with valuable insights and practical tips to help you bring your cherished truck back to life.

Get ready to embark on an exciting adventure of reviving the past and creating a masterpiece on wheels.
STEP 1 : Finding the Perfect Truck
Restoring a Chevy 67-72 truck begins with finding the ideal vehicle to work on. This step is crucial as it sets the foundation for the entire restoration project. Here are some key points to consider during your search:

-
Research and Preparation:
Before starting your search, it’s important to do some research on the Chevy 67-72 truck models. Familiarize yourself with the different trims, options, and features available during that era.
This knowledge will help you identify the specific truck you desire and understand its market value.
-
Online Classifieds:
Begin your search by exploring online classified platforms such as Craigslist, eBay, or dedicated classic car websites. These platforms often have a wide range of listings, allowing you to browse through various trucks based on location, condition, and price range.
Be sure to use specific keywords like “Chevy 67-72 truck” or “Chevrolet C10” to narrow down the search results.
-
Local Dealerships:
Contact local classic car dealerships and inquire about any Chevy 67-72 trucks they might have in stock. Dealerships specializing in vintage vehicles may have connections to collectors or enthusiasts who are looking to sell their trucks.
Visiting these dealerships can give you the opportunity to inspect the trucks in person and ask questions to gain more insight.
-
Classic Car Shows and Auctions:
Attending classic car shows and auctions can be an exciting way to find a Chevy 67-72 truck. These events often attract sellers and buyers of vintage vehicles, providing you with a chance to explore a wide selection of trucks in various conditions.
Take your time to inspect the trucks thoroughly, and if possible, consult with experts or experienced restorers at the event for their opinions.
-
Condition and Rust Repair:
When searching for a Chevy 67-72 truck, prioritize finding a vehicle with a solid body and minimal rust damage.
Rust repair can be a time-consuming and expensive process, so choosing a truck with less rust will save you both effort and money. Inspect the truck’s frame, body panels, floorboards, and bed for signs of rust or corrosion.
-
Budget Considerations:
Establish a budget for your restoration project and keep it in mind while searching for a truck.
The condition and rarity of these trucks can significantly impact their price, so be prepared to pay more for a well-preserved or highly sought-after model.
Set a realistic budget that includes the purchase price of the truck and the estimated costs of restoration parts and labor.
-
Vehicle History and Documentation:
Request the vehicle’s history and documentation from the seller whenever possible. This information can give you insights into the truck’s previous ownership, maintenance records, and any modifications that have been made.
It’s particularly beneficial to find a truck with a documented service history as it may indicate proper care and maintenance throughout its life.
Remember, patience is key when searching for the perfect Chevy 67-72 truck. Take your time to find a vehicle that meets your requirements and aligns with your vision for the restoration project.
Once you have found the right truck, you can move on to the next step of assessing its condition and planning the restoration process in our Restoring Chevy 67-72 truck step by step guide.
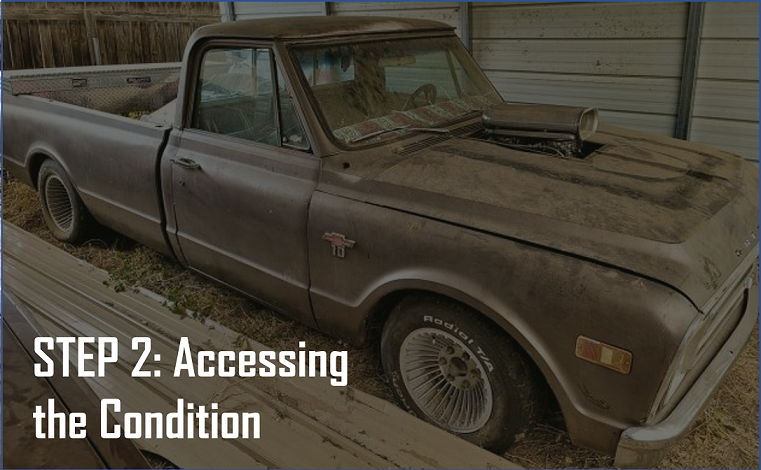
STEP 2: Assessing the Condition
Congratulations on acquiring your Chevy 67-72 truck! Now it’s time to assess its condition before diving into the restoration process.
A thorough evaluation will help you identify any areas that require repair or replacement, estimate the amount of work involved, and create a detailed plan for the restoration project.
Here’s a step-by-step guide on assessing the condition of your truck :
-
Exterior Inspection:
Begin by inspecting the truck’s exterior for any signs of damage, rust, or previous repairs. Walk around the vehicle and carefully examine the body panels, doors, fenders, and bed.
Look for dents, scratches, and any areas where the paint may be peeling or showing signs of wear. Pay close attention to the lower sections of the truck, as these areas are prone to rust.
-
Rust Evaluation:
Rust is a common issue in older vehicles, so it’s essential to identify the extent of rust damage on your Chevy truck. Check the body panels, floorboards, wheel arches, and the bed for any visible rust.
Use a magnet to determine if the rust is superficial or if it has eaten through the metal. Superficial rust can often be sanded and treated, while severe rust may require panel replacement or fabrication.
-
Mechanical Assessment:
Inspect the mechanical components of the truck to evaluate their condition. Check the engine, transmission, suspension, brakes, and exhaust system.
Look for signs of leaks, worn-out parts, or any obvious mechanical issues. It’s recommended to have a qualified mechanic or an experienced restorer inspect the engine and other mechanical systems for a more accurate assessment.
-
Electrical System:
Evaluate the electrical system of the truck, including the lights, wiring, and gauges. Test the headlights, taillights, turn signals, and interior lights to ensure they are functioning properly.
Look for frayed or damaged wiring and corroded connectors. Addressing any electrical issues early in the restoration process will save you time and frustration later on.
-
Interior Inspection:
Assess the condition of the truck’s interior, including the seats, dashboard, door panels, carpeting, and upholstery. Look for any tears, stains, or signs of wear.
Check the functionality of switches, knobs, and gauges. Make note of any components that require repair or replacement to restore the interior to its original or desired condition.
-
Frame and Undercarriage:
Carefully inspect the frame and undercarriage of the truck for any signs of rust, damage, or structural issues.
Look for any cracks, bends, or weakened areas. Pay attention to the suspension components, such as the leaf springs and control arms, to ensure they are in good condition.
A solid and well-maintained frame is essential for the safety and longevity of your restored truck.
-
Create a Checklist:
Based on your assessment, create a detailed checklist of the repairs and replacements needed for your Chevy 67-72 truck.
Categorize the checklist by bodywork, mechanical repairs, electrical repairs, and interior refurbishment.
This checklist will serve as your guide throughout the restoration process and help you estimate the time, effort, and budget required for each task.
Remember, assessing the condition of your Chevy 67-72 truck is a crucial step in the restoration journey. By thoroughly evaluating each aspect of the vehicle, you can identify the areas that need attention and plan your restoration project accordingly.
With a clear understanding of the required repairs, you can move on to the next step: disassembly and documentation in our Restoring Chevy 67-72 truck guide.
STEP 3 : Disassembly and Documentation
As a truck enthusiast embarking on the restoration of your Chevy 67-72 truck, the next crucial step after assessing its condition is the disassembly process.
Disassembling the truck allows you to access and repair individual components effectively. Additionally, documenting the disassembly process is essential for a smooth reassembly and ensuring accurate restoration.

Here’s a detailed Restoring Chevy 67-72 truck guide on how to approach the disassembly and documentation phase:
-
Gather the Necessary Tools:
Before starting the disassembly, gather the tools you’ll need for the job. This may include wrenches, sockets, screwdrivers, pliers, pry bars, and a camera for documentation. Having the right tools on hand will make the process easier and prevent unnecessary delays.
-
Create a Workspace:
Set up a clean and organized workspace where you can safely disassemble the truck. A spacious garage or workshop is ideal, providing ample room to work and store the removed parts. Clear the area of any obstacles and ensure you have proper lighting for better visibility.
-
Start with a Systematic Approach:
Begin the disassembly process systematically to ensure a smooth restoration workflow. Start from one end of the truck, such as the front or rear, and work your way through each section. This approach helps maintain order and prevents confusion during reassembly.
-
Take Photographs:
Before removing any parts, take clear and detailed photographs from multiple angles. These photographs will serve as a visual reference during the restoration, especially for complex assemblies or wiring configurations. Make sure to capture close-ups of specific components and connections.
-
Label and Document:
As you remove parts, label them clearly with tags or tape and make corresponding notes. Indicate the location and orientation of each part to facilitate reassembly. Document the process step-by-step, describing any challenges you encounter, special techniques used, or any additional observations.
-
Bag and Organize Small Parts:
For small components like bolts, screws, washers, and clips, use resealable bags to keep them organized. Label each bag with the part’s description and its corresponding location. This practice will prevent loss or confusion when it comes time to reassemble the truck.
-
Store Removed Parts Securely:
Designate a specific area or shelves to store the removed parts. Keep them organized and protected from dust, moisture, and potential damage. Consider using bins or containers for larger components. It’s also helpful to keep a log or spreadsheet that lists all the removed parts and their storage location.
-
Document Wiring and Connections:
Pay special attention to electrical wiring, hoses, and connections. Take detailed photographs of the routing, connectors, and any color-coding or labeling. Use colored tape or labels to mark each wire or hose before disconnecting. Creating a wiring diagram or schematic can also be beneficial for reference.
-
Special Considerations:
During disassembly, you may encounter components that require specialized attention or professional assistance. This includes delicate trim pieces, fragile glass, or complex mechanical assemblies. Assess the difficulty level and determine if any specific expertise or tools are needed.
-
Patience and Attention to Detail:
Disassembling a vehicle can be a time-consuming process, but exercising patience and maintaining attention to detail will pay off during the restoration.
Take your time, double-check connections and fasteners, and ensure proper documentation at every step.
By meticulously documenting the disassembly process, you’ll have a comprehensive reference for reassembling your Chevy 67-72 truck.
Clear photographs, labeled parts, and detailed notes will minimize confusion and ensure accurate restoration. Remember to organize and store the removed parts carefully, as they are valuable and contribute to the successful completion of your restoration project.
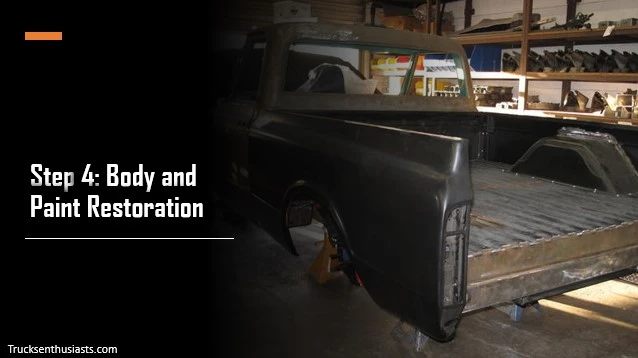
STEP 4: Body and Paint Restoration
As a truck enthusiast, you’re well aware that restoring the body and paint of your Chevy 67-72 truck is a significant undertaking.
This step from Restoring Chevy 67-72 truck Guide , requires careful attention to detail, patience, and a meticulous approach. Follow this comprehensive guide to successfully restore the bodywork and paint of your truck:
-
Assess the Bodywork:
Start by closely examining the body panels and identifying any areas that require attention. Look for rust, dents, scratches, and other imperfections.
Pay special attention to the lower sections of the truck, where rust commonly accumulates. Determine which panels need repair or replacement, and make a list of the necessary materials and tools.
-
Rust Repair:
If your truck has rusted areas, it’s crucial to address them before proceeding with the paint restoration. Begin by removing any loose rust with sandpaper or a wire brush.
For minor surface rust, you can treat the affected areas with a rust converter or rust inhibitor. However, if the rust has penetrated the metal, it may be necessary to cut out and replace the damaged sections with new panels.
-
Body Panel Replacement:
If the rust or damage to a body panel is extensive, it may be more practical to replace the entire panel. You can find reproduction panels specifically designed for Chevy 67-72 trucks from various suppliers.
Carefully remove the damaged panel, ensuring you keep track of any hardware or clips that need to be transferred to the new panel. Install the new panel and align it properly before proceeding to the next steps.
-
Surface Preparation:
Before applying any paint, it’s essential to prepare the body surface properly. Start by thoroughly cleaning the entire truck with a mild detergent to remove dirt, grime, and grease.
Rinse it off and allow it to dry completely. Next, sand the surface with varying grits of sandpaper to create a smooth and even surface. This step helps remove imperfections and promotes adhesion for the primer and paint.
-
Applying Primer:
Priming the truck is a crucial step in the restoration process. Choose a high-quality automotive primer suitable for your project.
Apply multiple coats of primer, allowing each coat to dry thoroughly before sanding with fine-grit sandpaper. This process helps create a uniform surface, fills in any minor imperfections, and provides a solid base for the paint.
-
Paint Selection:
Selecting the right paint for your Chevy 67-72 truck restoration project is an important decision. You can choose to replicate the original factory color or opt for a custom finish that suits your taste.
Consider factors such as durability, color accuracy, and the overall aesthetic appeal. Consult with automotive paint specialists or fellow enthusiasts for guidance in choosing the appropriate paint type and brand.
-
Painting Techniques:
To achieve a professional-looking paint job, it’s recommended to use a spray gun for application. Set up a controlled environment in a well-ventilated paint booth or garage with proper masking and ventilation.
Apply multiple coats of paint, allowing each coat to dry according to the manufacturer’s instructions. Sand between coats with fine-grit sandpaper to achieve a smooth finish.
Follow the recommended paint application techniques and ensure proper coverage and even distribution.
-
Clear Coat and Finishing:
To protect and enhance the paint, apply a clear coat after the base color has dried. Clear coat adds depth and shine to the finish, while also providing an extra layer of protection against UV rays and environmental elements.
Apply several coats of clear coat, sanding between each coat for optimal results. Once the clear coat is fully cured, use a high-quality automotive polish to bring out the luster and shine of the paint.
-
Reassembly and Final Touches:
After the paint has fully cured, carefully reassemble the truck, referring to the documentation and notes you made during the disassembly process.
Take your time to ensure that all components are installed correctly and securely. Pay attention to alignment, fitment, and proper connection of electrical and mechanical parts.
This is also a good opportunity to replace any worn-out or damaged trim pieces, weatherstripping, and other exterior accessories.
-
Inspection:
Finally, give your truck a thorough inspection and make any necessary final touches. Check for any imperfections in the paint job, such as dust particles or unevenness, and address them accordingly.
Polish any chrome or stainless steel accents to restore their shine. Take pride in the final outcome of your body and paint restoration, knowing that your Chevy 67-72 truck has been transformed into a visually stunning and protected masterpiece.
Remember, the body and paint restoration process requires patience, attention to detail, and the use of quality materials.
If you lack experience or confidence in completing this step on your own, consider seeking professional assistance or guidance from experienced automotive restoration specialists. With proper care and maintenance, your restored truck will turn heads and bring joy for many years to come.
In the next step of Restoring Chevy 67-72 truck guide, we’ll delve into the mechanical restoration of your Chevy 67-72 truck, ensuring that it runs smoothly and reliably. Stay tuned for an exciting journey under the hood!
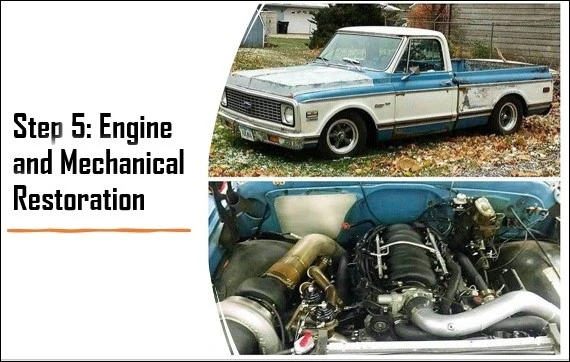
STEP 5: Engine and Mechanical Restoration
As a dedicated truck enthusiast, you understand that the engine is the beating heart of your Chevy 67-72 truck. Restoring the mechanical components of your vehicle is a crucial step to ensure optimal performance, reliability, and a satisfying driving experience. Here’s a detailed guide on how to approach the engine and mechanical restoration:
-
Engine Inspection:
Start by conducting a thorough inspection of the engine. Check for any signs of leaks, worn-out components, or mechanical issues. Inspect the belts, hoses, and wiring connections.
Look for oil leaks, coolant leaks, or any unusual noises. It’s recommended to have a qualified mechanic or an experienced restorer perform a more detailed inspection and diagnose any potential problems.
-
Engine Rebuild or Replacement:
Depending on the condition of your engine, you may choose to rebuild it or replace it entirely. If the engine is in relatively good shape, a rebuild may involve replacing gaskets, seals, piston rings, and other worn-out parts.
However, if the engine is severely damaged or beyond repair, it may be more practical to source a replacement engine. Consult with experts to determine the best course of action based on your budget and long-term goals.
-
Transmission and Drivetrain:
Evaluate the condition of the transmission and drivetrain components. Inspect the transmission for any signs of slipping, grinding, or other issues.
Consider replacing worn-out clutch components or automatic transmission bands, if necessary. Check the driveshaft, differential, and axles for any signs of damage or excessive wear.
Address any issues with the drivetrain to ensure smooth power delivery and efficient performance.
-
Suspension and Steering:
Examine the suspension and steering components to ensure they are in good working order. Check the shocks, struts, control arms, and bushings for wear or damage.
Replace any worn-out or damaged parts to restore proper handling and stability. Additionally, inspect the steering system, including the steering box, tie rods, and ball joints. Address any play or looseness in the steering to ensure precise control.
-
Brakes and Exhaust System:
Inspect the brake system thoroughly. Check the brake pads, rotors, drums, calipers, and brake lines for wear or damage. Replace any worn-out components and ensure proper brake fluid levels.
Additionally, assess the condition of the exhaust system, including the manifold, pipes, and muffler. Repair or replace any rusted or damaged sections to maintain proper exhaust flow and reduce noise.
-
Electrical System and Wiring:
Evaluate the electrical system of your truck, including the battery, alternator, starter, and wiring connections. Clean or replace corroded terminals and connectors.
Test the functionality of lights, gauges, and other electrical components. Address any electrical issues promptly to ensure a reliable and efficient electrical system.
-
Professional Tune-up:
Consider having a professional engine tune-up performed to optimize performance and reliability. This may involve adjusting ignition timing, replacing spark plugs, cleaning or rebuilding carburetors, and ensuring proper fuel delivery.
A professional tune-up can enhance power, fuel efficiency, and overall drivability of your restored truck.
-
Fluids and Lubrication:
Replace all fluids, including engine oil, coolant, transmission fluid, and differential fluid. Use high-quality fluids recommended by the manufacturer for optimal performance and longevity.
Proper lubrication is essential for the smooth operation of mechanical components and helps prevent premature wear and damage.
-
Test and Fine-tuning:
After completing the mechanical restoration, thoroughly test your truck’s performance on the road. Monitor engine temperature, oil pressure, and other vital indicators.
Listen for any abnormal noises or vibrations. Fine-tune the engine and mechanical components as needed to achieve optimal performance and reliability.
Remember, the engine and mechanical restoration process requires technical knowledge and experience.
STEP 6: Interior Refurbishment
The interior of your Chevy 67-72 truck is where you’ll spend most of your time while driving and enjoying the vehicle. Restoring the interior not only enhances the aesthetics but also creates a comfortable and inviting space.
Here’s a detailed guide on how to approach the interior refurbishment of your truck:

-
Evaluate the Condition:
Start by evaluating the condition of the interior components. Check the seats, carpet, headliner, door panels, dashboard, and other interior surfaces.
Look for signs of wear, tears, stains, or any damage that needs attention. Assess the functionality of switches, knobs, and gauges to determine if any repairs or replacements are necessary.
-
Upholstery Repair or Replacement:
If the seats have worn-out or damaged upholstery, consider repairing or replacing them. Depending on your budget and preference, you can opt for original-style upholstery or choose custom options.
Repair any tears or damaged areas using appropriate techniques and materials. Ensure that the seat padding is comfortable and supportive.
-
Carpet Replacement:
The carpeting in your truck may be worn, stained, or torn over time. Replace it with a new carpet kit designed specifically for your Chevy 67-72 truck. Remove the old carpet, clean the floor thoroughly, and install the new carpet using proper adhesives and fasteners.
This step not only improves the appearance but also reduces noise and enhances comfort inside the cabin.
-
Dashboard and Gauges:
The dashboard is a focal point of the interior, so it’s important to restore it properly. Evaluate the condition of the dashboard and determine if it needs repair or refurbishment.
Repair any cracks or damaged areas using appropriate fillers and techniques. If the dashboard cannot be repaired, consider replacing it with a reproduction or sourced original part. Polish or replace the gauges and clean the lenses for clear visibility.
-
Door Panels and Trim:
Inspect the door panels for any damage or wear. Repair or replace damaged panels using correct materials and techniques.
Ensure that the door handles, window cranks, and other trim pieces are functional and in good condition. Clean or replace any worn-out or broken interior trim components.
-
Headliner and Visors:
Evaluate the condition of the headliner and sun visors. Repair or replace them if they are sagging, stained, or damaged.
Properly install a new headliner using adhesive and ensure it is taut and wrinkle-free. Clean or replace the sun visors to complete the fresh look of the interior.
-
Interior Accessories:
To add authenticity and enhance the vintage feel of your truck, consider adding authentic or period-correct interior accessories.
This may include a retro-style radio, vintage-style knobs, steering wheel, or other period-appropriate accessories.
Pay attention to small details like door handles, window cranks, and knobs, as they contribute to the overall authenticity and character of the interior.
-
Upholstery Cleaning and Conditioning:
After refurbishing or replacing upholstery, thoroughly clean and condition it using appropriate products.
Use upholstery cleaners to remove any stains or dirt and apply conditioners to keep the materials supple and protected. Regular cleaning and conditioning will extend the lifespan of your interior and keep it looking its best.
-
Soundproofing and Insulation:
Consider adding soundproofing and insulation materials to reduce noise, improve temperature control, and enhance comfort inside the cabin.
Install sound deadening mats or insulation in strategic areas, such as the floor, doors, and roof, to create a quieter and more pleasant driving experience.
-
Final Touches:
Complete the interior restoration by paying attention to the finer details. Replace worn-out or broken knobs, switches, and vents. Ensure that all interior lights, including the dashboard illumination, are functioning properly.
Clean and polish any remaining interiorsurfaces, such as the steering wheel, center console, and trim pieces. Take the time to meticulously clean the windows and mirrors for crystal-clear visibility.
As a final touch, consider adding personal touches to make the interior of your truck truly unique. This can include custom floor mats, seat covers, or even personalized dashboard accessories. Embrace your creativity and make the interior reflect your own style and preferences.
By following these steps, you can bring back the original charm and character of your Chevy 67-72 truck’s interior. A well-restored and comfortable interior will not only enhance your driving experience but also impress passengers and fellow enthusiasts.
In the next step, we’ll explore the final touches and finishing details of your Chevy 67-72 truck restoration. Stay tuned for the exciting conclusion of this comprehensive step-by-step guide!
STEP 7: Reassembly and Finishing Touches
After successfully completing the restoration of individual components, it’s time to bring your Chevy 67-72 truck back to its full glory through the reassembly process.
This step requires careful attention to detail and a reference to the documentation and notes you made during the disassembly phase.
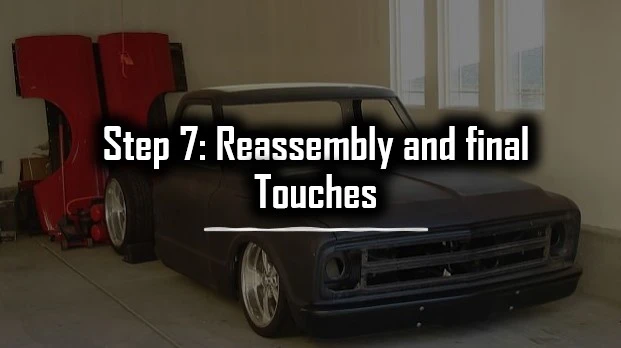
Here’s a detailed guide on how to approach the reassembly and add those finishing touches:
-
Consult Your Documentation:
Refer to the documentation you created during the disassembly phase, including photographs, labels, and notes.
This will serve as your guide to ensure that each component is reinstalled correctly and in the right order. Pay attention to the finer details and take your time to avoid any mistakes or oversights.
-
Organize and Assemble:
Organize the restored components, ensuring they are easily accessible during the reassembly process. Begin by reassembling the major components, such as the engine, transmission, suspension, and drivetrain.
Use the proper tools and techniques to secure these components and ensure proper alignment and fitment.
-
Wiring and Electrical Connections:
Reconnect the wiring harnesses, cables, and electrical connections. Use your documentation to guide you through the proper routing and connection points.
Check for any damaged wires or connectors and address them accordingly. Test the functionality of lights, switches, and other electrical components to ensure everything is working properly.
-
Interior Reinstallation:
Carefully reinstall the interior components, including the seats, dashboard, door panels, and trim pieces. Ensure that all fasteners, clips, and screws are properly tightened and secured.
Take the time to align the panels and trim for a clean and cohesive look. Install any additional interior accessories or personalized touches to further enhance the aesthetics.
-
Exterior Finishing Touches:
Now it’s time to add those final touches that will truly elevate the overall appearance of your Chevy truck. Install chrome accents, such as bumpers, grilles, and trim pieces, to bring out the classic and stylish look.
Attach emblems and badges in their appropriate positions to showcase the authenticity of your restoration. Polish any stainless steel or chrome surfaces for a gleaming finish.
-
Bed Restoration:
If your Chevy truck features a bed, it’s essential to pay attention to its restoration. Clean and repair the bed floor, addressing any dents or damage.
Consider adding a fresh coat of paint or a protective bed liner to ensure durability and longevity. Install new bed wood or bed liner material, ensuring a secure and visually appealing finish.
-
Detailing and Final Inspection:
Before the completion of your restoration project, take the time to thoroughly clean and detail your truck. Polish the exterior surfaces to achieve a brilliant shine.
Clean the windows, mirrors, and other glass elements for a crystal-clear view. Inspect all areas for any remaining imperfections or loose components.
Make any necessary adjustments or corrections to ensure a pristine and well-executed restoration.
-
Test Drive and Celebration:
Once you’ve completed the reassembly and finishing touches, it’s time to take your Chevy 67-72 truck for a test drive. Evaluate its performance, handling, and overall drivability.
Pay attention to any unexpected noises or issues that may require further attention. Celebrate the successful restoration of your beloved truck and enjoy the fruits of your labor.
By following these steps and adding those crucial finishing touches, you can bring your Chevy 67-72 truck back to its original splendor. The reassembly and final details will showcase your dedication to preserving the authenticity and character of this iconic vehicle. Now it’s time to hit the road and proudly display your fully restored Chevy truck!
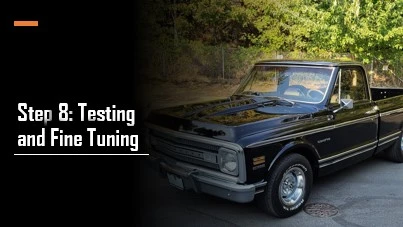
STEP 8: Testing and Fine-Tuning
After investing time, effort, and resources into restoring your Chevy 67-72 truck, it’s essential to thoroughly test and fine-tune the vehicle to ensure its safety, reliability, and optimal performance.
Here’s a detailed guide on how to approach testing and fine-tuning your truck after restoration:
-
Electrical System:
Begin by thoroughly checking the electrical system. Test all lights, including headlights, taillights, turn signals, and interior lights, to ensure they are functioning properly.
Verify the functionality of switches, gauges, and other electrical components. Inspect the wiring for any loose connections or potential issues.
-
Brake System:
The brake system is critical for your safety and the safety of others on the road. Inspect the brake components, including the brake pads, rotors, drums, calipers, and brake lines.
Check for proper fluid levels and ensure there are no leaks. Test the brakes to ensure they are responsive and provide adequate stopping power.
-
Steering and Suspension:
Evaluate the steering and suspension components for any signs of wear, damage, or loose connections. Check the steering wheel alignment and test the responsiveness of the steering system.
Inspect the suspension components, including shocks, springs, control arms, and bushings. Ensure that they are in good condition and provide a smooth and controlled ride.
-
Engine Performance:
Take your truck for a test drive to assess its engine performance. Pay attention to acceleration, smoothness, and any unusual noises.
Monitor the engine temperature and oil pressure to ensure they are within the appropriate ranges. If necessary, perform adjustments or fine-tuning to optimize the engine’s performance and efficiency.
-
Transmission and Drivetrain:
Test the transmission to ensure smooth shifting between gears and proper engagement. Check the fluid levels and look for any leaks.
Inspect the drivetrain components, including the driveshaft, differential, and axles, for any signs of wear or damage. Address any issues to maintain reliable power transfer and smooth operation.
-
Cooling System:
Monitor the cooling system to ensure that the engine maintains the appropriate operating temperature. Check for leaks, inspect the radiator, hoses, and water pump, and ensure that the coolant levels are adequate.
Address any cooling system issues promptly to prevent engine overheating.
-
Fine-Tuning:
During the testing phase, you may discover minor adjustments or improvements that can be made. Fine-tune the vehicle by addressing any issues that arise during testing.
This can include adjusting carburetor settings, optimizing ignition timing, or fine-tuning suspension settings for a better ride quality.
-
Safety Inspection:
Once you are satisfied with the performance of your truck, consider having a professional safety inspection. A certified mechanic or automotive specialist can conduct a thorough inspection, verifying that all components are functioning correctly and meeting safety standards.
This will provide you with peace of mind and ensure that your truck is roadworthy.
-
Ongoing Maintenance:
After the restoration and testing phases, it’s crucial to establish a regular maintenance routine for your truck. Adhere to manufacturer-recommended service intervals for oil changes, filter replacements, and other maintenance tasks.
Keep the vehicle clean, lubricate moving parts, and monitor fluid levels regularly. Ongoing maintenance will help preserve the restored condition of your truck and prolong its lifespan.
By conducting thorough testing, addressing any issues, and fine-tuning your Chevy 67-72 truck, you’ll ensure that it is safe, reliable, and performs at its best.
Testing and fine-tuning are vital steps in the restoration process, allowing you to enjoy your truck to the fullest and showcase the results of your hard work and dedication.
Conclusion for Restoring Chevy 67-72 truck
Restoring a Chevy 67-72 truck is a labor of love and a journey that brings back the timeless beauty and nostalgia of these classic vehicles.
Throughout this step-by-step guide, we have explored the process of restoring a Chevy 67-72 truck, covering everything from finding the perfect truck to the final touches and fine-tuning.
Let’s summarize the essential steps:
Step 1: Finding the Perfect Truck Begin by searching for a solid base that requires minimal rust repair. Consider your budget and explore various sources such as online classifieds, local dealerships, and classic car shows or auctions.
Step 2: Assessing the Condition Thoroughly evaluate the truck’s condition, identifying rust, body damage, and mechanical issues. This assessment will help you plan the restoration process and estimate the required time, effort, and budget.
Step 3: Disassembly and Documentation Document each step of the disassembly process with photographs, labels, and detailed notes. This documentation will be invaluable during the reassembly phase, ensuring an accurate and efficient restoration.
Step 4: Body and Paint Restoration Repair or replace any rusted or damaged panels and prepare the body for a fresh coat of paint. Choose a color that matches the original or suits your personal style. A high-quality paint job will breathe new life into your truck and protect it for years to come.
Step 5: Engine and Mechanical Restoration Inspect and rebuild the engine and address any mechanical issues. Pay attention to the transmission, suspension, brakes, and exhaust system. A professional engine tune-up and rebuild will enhance performance and reliability.
Step 6: Interior Refurbishment Restore the interior by repairing or replacing damaged upholstery, installing a new carpet, and refurbishing the dashboard and gauges. Add authentic or period-correct accessories to complete the vintage look and feel.
Step 7: Reassembly and Finishing Touches Reassemble the truck, referring to your documentation for guidance. Add finishing touches such as chrome accents, emblems, and a polished bed. These final details will enhance the overall aesthetic and authenticity.
Step 8: Testing and Fine-Tuning Thoroughly test the truck’s safety, performance, and functionality. Check the electrical system, brakes, steering, and other vital components. Fine-tune as necessary to optimize performance and address any issues that arise.
Through these steps, you can transform your Chevy 67-72 truck into a stunning piece of automotive history. The restoration process requires patience, attention to detail, and a passion for preserving the unique characteristics of these classic vehicles.
Whether you’re a seasoned truck enthusiast or embarking on your first restoration project, the satisfaction of seeing your Chevy truck return to its former glory is incomparable.
Remember, a successful restoration is not only about the end result but also the joy of the journey. Embrace the challenges, learn new skills, and appreciate the rich history and craftsmanship that these trucks embody.
Take pride in the hard work and dedication you invest in restoring your Chevy 67-72 truck, and enjoy the rewards of owning a truly remarkable piece of automotive art.
So, are you ready to embark on your Chevy 67-72 truck restoration journey?
Start by finding the perfect truck and follow each step with passion and precision. Before long, you’ll be cruising down the road in a fully restored and head-turning classic Chevy truck. Happy restoring!
We hope you enjoyed our aritlce “Restoring a Chevy 67-72 Truck: A Step-by-Step Guide” to its entire bits.
We do hope that this article helped you in making a definitive choice when it comes to restore a Chevy 67-72 truck.
If it really helped you,we’ll be glad if you could share this article on social media services like Google+,Twitter,linkedin,Stumple Upon and Facebook using the Sharing buttons on the Top and End of this articles.
If you have any query Feel free to add you thoughts in the comment section below.
We’ll happy to know your views.Do expect a quick reply.
Stay tunned for more updates.Thank You.

Vicky Dwaj, Founder and CEO of TrucksEnthusiasts , is an automobile engineer passionate about pickup trucks and accessories. Follow his journey to discover the latest trends in off-road accessories, cars, and truck parts.