Master the Art of Automotive Spray Painting with These 10 Expert Steps
Spray Paint Your Car Like a Pro: 10 Essential Steps for Perfect Results
You’ll be amazed to discover how simple it can be to spray paint on a car. However, it’s important to understand that you can’t simply grab a can of paint and start spraying right away.
There are a few fundamental things you need to be aware of, both when preparing to paint and during the actual application process.
Discover the secrets to achieving a professional-quality auto spray paint job with these 10 simple steps.
Whether you’re a beginner or an experienced painter, this step-by-step guide will provide you with detailed instructions and valuable tips.
If you want to dive deeper and learn the complete secrets and hacks of auto spray painting in just 2 hours or less, check here.

Don’t miss out on this opportunity to enhance your painting skills and create stunning results!
Step A: Prepare and Gather Necessary Items
Before you begin the car spray painting process, it’s crucial to prepare yourself and gather all the required items. Here’s a detailed explanation of this initial step:

- Collect the Necessary Items: Make a checklist of all the items you’ll need for the spray painting process. These typically include automotive paint, primer, clear coat, spray gun, air compressor, masking tape, plastic sheeting, sandpaper, tack cloth, gloves, safety glasses, and a respirator mask. Ensure you have everything readily available before you start.
- Protect the Surrounding Area: It’s essential to safeguard the surrounding area from overspray, which can unintentionally coat nearby objects or surfaces. Move the car to a well-ventilated area, preferably outdoors, and away from other vehicles or valuable items. Cover the ground with a drop cloth or plastic sheeting to prevent paint from staining the surface. Remove any loose debris or objects that may interfere with the painting process.
- Remove Parts that Don’t Require Painting: If possible, remove any parts of the car that you don’t intend to paint, such as bumpers, trim, or mirrors. This step ensures better access to the areas that need to be painted and minimizes the risk of accidentally spraying unwanted surfaces. Follow the car’s specific instructions or consult a professional if you’re unsure about removing certain components.
- Masking and Covering: For the areas that can’t be removed, use masking tape and paper to cover them thoroughly. Carefully apply masking tape along the edges of windows, door handles, headlights, and any other parts that shouldn’t be painted. Cover the surrounding areas with plastic sheeting, ensuring complete coverage and secure attachment. This step protects these areas from overspray and allows you to achieve clean, precise paint lines.
By following these detailed instructions for Step A, you’ll be well-prepared and have a protected workspace before diving into the car spray painting process.
Step B: Inspect and Prepare the Car’s Surface
To ensure a smooth and successful car spray painting process, it’s crucial to thoroughly inspect the car’s surface and prepare it accordingly. Here’s a detailed explanation of Step B:

- Careful Examination: Begin by carefully inspecting the entire surface of the car. Look for any rough spots, imperfections, or uneven areas that may affect the paint application. These could include scratches, dents, or previous paintwork that requires attention.
- Sanding Rough Spots: Once you’ve identified rough spots or imperfections, use 300 grit sandpaper to sand them down. Gently sand the affected areas in a back-and-forth motion, applying even pressure. Sanding helps smoothen the surface by removing any unevenness or texture, allowing the spray car paint to adhere better.
- Dust and Debris Removal: After sanding, it’s crucial to remove all the dust, dirt, and debris from the car’s surface. Use a clean, dry cloth or a tack cloth specifically designed to pick up dust particles. Wipe the entire car’s surface thoroughly, ensuring all the sanding residue and loose particles are eliminated. This step is vital because any remaining debris can negatively impact the paint’s adhesion and lead to an uneven finish.
- Achieving a Perfectly Clean Surface: To ensure optimal paint adhesion, it’s imperative to have a perfectly clean car surface. Wash the entire car with a mild automotive detergent and water, using a sponge or soft cloth. Rinse thoroughly to remove any soap residue. Allow the car to dry completely before proceeding with the painting process. If needed, you can use a clean microfiber cloth to gently dry the surface and prevent water spots.
By following these detailed instructions for Step B, you’ll ensure that the car’s surface is properly prepared, free from rough spots, and perfectly clean. This meticulous preparation is essential for achieving a flawless and long-lasting spray paint finish.
Step C: Apply Primer
In order to achieve an even and durable coat of colored paint, it is essential to apply a primer. This step helps the paint adhere to the car’s surface effectively. Here’s a detailed explanation of Step C:

- Importance of Primer: Primer serves as a preparatory layer that promotes better adhesion of the colored paint and provides a smooth and uniform surface for the final paint application. It also helps to seal the underlying surface, preventing rust, corrosion, and other potential damage.
- Choosing the Right Primer: Select a primer specifically formulated for automotive use. Consider factors such as the type of paint you’ll be using (solvent-based or water-based) and the compatibility with the car’s surface material (such as metal, plastic, or fiberglass). Follow the manufacturer’s instructions for proper application and drying times.
- Applying the Primer: Before spraying the primer, ensure that you are working in a well-ventilated area and wearing appropriate protective equipment, including a respirator mask. Hold the spray gun approximately 6-8 inches away from the car’s surface to achieve optimal coverage.
- Light Coats and Drying Time: Apply thin, light coats of primer rather than a heavy layer. This technique helps to prevent drips, runs, and uneven texture. Allow each coat to dry according to the manufacturer’s instructions before applying the next one. Typically, this may range from 10-15 minutes to several hours, depending on the type of primer used.
- Getting Familiar with Spray Techniques: Applying primer and paint with a spray gun requires practice to achieve a smooth and professional finish. It’s important to experiment with different spraying techniques, such as maintaining a consistent distance, using even strokes, and overlapping each pass slightly to ensure even coverage.
Remember, the application of primer is a crucial step in the car spray painting process. It enhances adhesion, promotes a uniform paint finish, and contributes to the longevity of the final result. With practice and patience, you’ll become more comfortable with the techniques involved in spraying car paint.
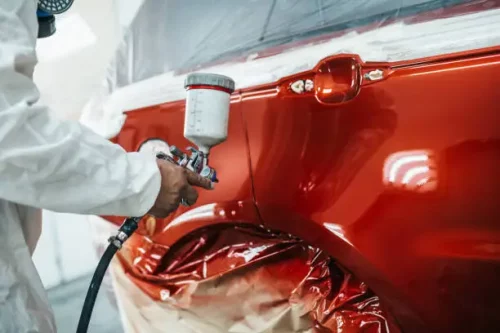
Step D: Start Painting with Color
At this stage, you’re almost ready to begin applying the colored paint to your car’s surface. Whether you’ve chosen aerosol cans or a spray gun, here’s a detailed explanation of Step D:

- Practice Strokes: Before starting on the car itself, it’s beneficial to make a few practice strokes on a separate object. This allows you to familiarize yourself with the spraying technique, adjust the nozzle or gun settings, and gauge the paint’s coverage and consistency.
- Aerosol Cans or Spray Gun: Depending on your preference and available equipment, you can either use aerosol cans or a spray gun for applying the color. Aerosol cans provide convenience and ease of use, while spray guns offer more control and customization. Follow the instructions provided with the chosen method for optimal results.
- Avoid Hesitation: When you’re ready to start painting the car, it’s important to begin each pass without hesitation. Hesitation or stopping in one spot can lead to uneven coverage and potential paint runs. Maintain a steady motion as you apply the paint, ensuring smooth and consistent strokes.
- Preventing Uneven Coverage and Runs: To achieve an even and uniform coat of paint, maintain a consistent distance between the spray can or gun and the car’s surface. Use overlapping strokes to ensure complete coverage. Avoid concentrating the paint in one area, as it can result in uneven color distribution. If the paint runs, it can lead to an extensive repair job.
- Follow Equipment or Spray Can Instructions: It’s highly likely that you’ll receive specific instructions on how to spray car paint with the chosen equipment or spray cans. It’s crucial to carefully read and follow these instructions to ensure proper application, drying times, and any additional considerations.
By following these detailed instructions for Step D, you’ll be well-equipped to apply the colored paint to your car’s surface. Remember to practice, maintain a steady motion, and refer to any provided instructions to achieve a professional-looking finish.
Step E: Consider Wet Sanding between Coats (Optional)
In the car spray painting process, it’s optional to wet sand between coats of primer and color paints. This step can provide additional smoothness and improve the final finish. Here’s a detailed explanation of Step E:

- Understanding Wet Sanding: Wet sanding involves using wet sandpaper and water to gently sand the painted surface between coats. The purpose is to smooth out imperfections, remove any dust particles or debris, and enhance the overall finish. Wet sanding can help achieve a smoother and more professional-looking result.
- Benefits and Considerations: Wet sanding can help eliminate orange peel texture, dust nibs, or minor imperfections that may have occurred during the painting process. It also creates a smoother surface for subsequent coats of paint. However, wet sanding requires careful execution to avoid removing too much paint or creating uneven surfaces. It’s essential to assess the condition of the painted surface and decide if wet sanding is necessary for your specific project.
- Proper Technique: If you decide to proceed with wet sanding, ensure you have the appropriate grit sandpaper, typically ranging from 800 to 2000 grit. Wet the sandpaper and the surface with water, and apply light pressure while sanding in a circular or back-and-forth motion. Continuously flush away sanding residue to prevent it from scratching the surface. Always follow proper wet sanding techniques to achieve the desired outcome.
Remember, wet sanding between coats is an optional step that can enhance the overall quality of the paint finish. It’s important to gather information, consider the condition of the surface, and exercise caution when executing this technique.
Step F: Apply Clear Coats for the Finishing Touch
After achieving your desired color, it’s time to apply several clear coats to give your car a glossy and finished appearance. These clear coats not only enhance the visual appeal but also provide protection for the paint finish. Here’s a detailed explanation of Step F:

- Importance of Clear Coats: Clear coats are transparent layers that add shine, depth, and a protective barrier to the painted surface. They create a glossy finish, enhance the color’s vibrancy, and guard against environmental factors like UV rays, dirt, and minor scratches.
- Determine the Number of Coats: Typically, two coats of clear coat are sufficient to achieve a satisfactory result. However, the number of coats can vary depending on personal preference and the desired level of gloss. You may choose to apply additional coats if you prefer an extra shiny finish or want to ensure maximum protection. Consider the manufacturer’s recommendations for the specific clear coat product you’re using.
- Allow Drying Time: Between each clear coat application, it’s crucial to ensure that the previous coat is completely dry. Follow the drying time mentioned in the product instructions or allow ample time based on the prevailing weather conditions. Applying the next coat before the previous one is fully dry can lead to issues like uneven texture or smudging.
- Application Technique: When applying clear coats, use the same spraying techniques as with the color paint. Maintain a consistent distance, apply light and even coats, and use overlapping strokes for complete coverage. Be mindful of overspray and avoid excessive buildup in certain areas.
- Patience for Optimal Results: Patience is key during this step. Allow sufficient drying time for the final clear coats to cure properly. This will ensure a durable finish and long-lasting protection for your car’s paintwork.
By following these detailed instructions for Step F, you can add the finishing touches to your car’s paint job. Applying clear coats not only enhances the visual appeal but also provides an extra layer of protection. Remember to consider drying time, apply coats evenly, and exercise patience for the best results.
Step G: Optional Wet Sanding for Finishing Touches
In the final step of the car spray painting process, you have the option to perform wet sanding to further refine the finish. It’s recommended to seek advice from individuals experienced in car spray painting before proceeding.
If you choose to follow this step, the following grit sequence is suggested: 800, 1000, 1200, 1500, and finally 2000. Wet sanding can help eliminate imperfections and heavy spots in the clear coat application. Here’s a detailed explanation of Step G:

- Consider Wet Sanding: Wet sanding can be an optional step to achieve an even smoother and flawless finish. It can help eliminate any remaining imperfections, dust nibs, or orange peel texture that might be present after applying the clear coats. However, it’s advisable to consult with experts or individuals experienced in car spray painting to determine if wet sanding is necessary for your specific project.
- Seek Advice: Before proceeding with wet sanding, it’s important to seek advice from individuals knowledgeable in car spray painting. They can provide guidance on the condition of the surface, the need for wet sanding, and the specific techniques involved.
- Wet Sanding Grit Sequence: If you decide to proceed with wet sanding, it’s recommended to use the following grit sequence: 800, 1000, 1200, 1500, and finally 2000. Start with the coarser grits and gradually progress to finer grits to achieve a smoother finish. Wet the sandpaper and the surface with water to reduce friction and prevent damage to the paintwork.
- Technique and Caution: When wet sanding, use a gentle and even pressure while sanding in a circular or back-and-forth motion. Continuously flush away sanding residue with water to prevent it from scratching the surface. Pay attention to the level of pressure applied and be cautious not to remove too much clear coat or create uneven surfaces.
By considering wet sanding and following the suggested grit sequence, you have the opportunity to refine the finish by removing any heavy spots or imperfections in the clear coat. However, it’s important to seek advice, exercise caution, and practice proper wet sanding techniques for optimal results.
Step H: Buffing with Rubbing Compound and 2000 Grit Sandpaper
In the final step of the car spray painting process, you will use a rubbing compound and 2000 grit sandpaper to buff the surface and remove any remaining scratches. Here’s a detailed explanation of Step H:
- Apply Rubbing Compound: Rubbing compound is a polishing agent that helps remove light scratches, swirl marks, and imperfections from the painted surface. Apply a small amount of rubbing compound onto a clean, soft cloth or polishing pad.
- Buffing Technique: Using moderate pressure, gently rub the rubbing compound onto the painted surface in a circular motion. Work on a small area at a time, overlapping the strokes. Continue buffing until the scratches or imperfections begin to fade. Be mindful not to apply excessive pressure, as it may damage the paintwork.
- Inspect and Repeat if Necessary: After buffing, inspect the surface to determine if all the scratches have been successfully removed. If there are still noticeable scratches or blemishes, repeat the process of applying rubbing compound and buffing until the desired result is achieved.
- Wet Sanding with 2000 Grit: If there are deeper scratches or stubborn imperfections that were not eliminated with the rubbing compound, you can opt for wet sanding with 2000 grit sandpaper. Wet the sandpaper and the surface with water, then gently sand the affected area using a circular or back-and-forth motion. Continuously flush away sanding residue with water and periodically check the surface to ensure you’re not removing excessive clear coat or causing further damage.
- Final Inspection: Once you’ve finished buffing and sanding, carefully inspect the painted surface to ensure that all scratches and imperfections have been effectively removed. Make any necessary touch-ups or corrections before proceeding to the final step.
By utilizing rubbing compound and 2000 grit sandpaper, you can effectively buff the surface and address any remaining scratches or imperfections. Remember to use proper technique, work in small sections, and periodically inspect the surface to achieve a smooth and flawless finish.
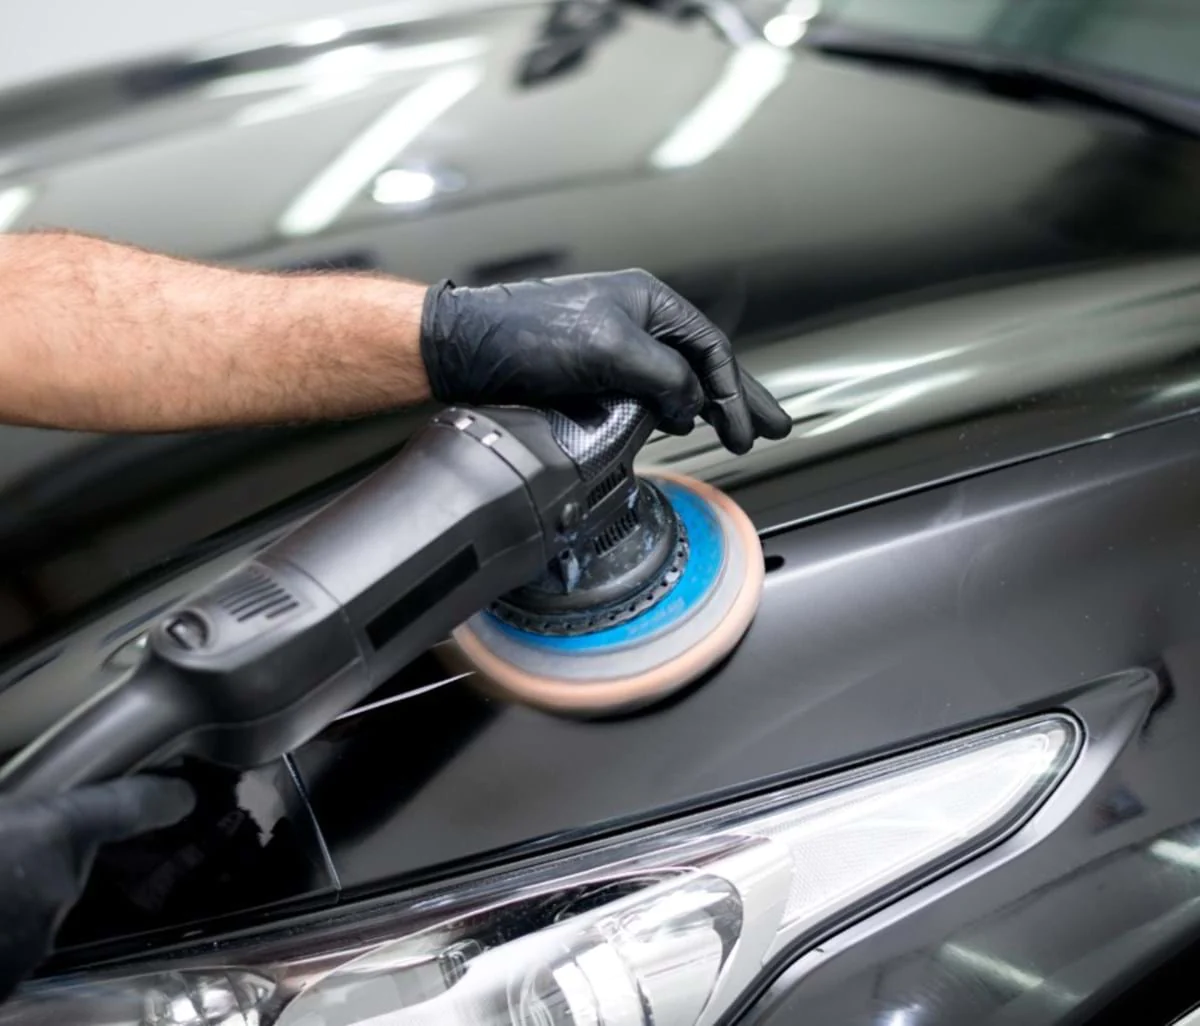
Step I: Buffing the Surface with Medium Cut Polish for a Glassy Finish
In the penultimate step of the car spray painting process, you will buff the surface using a medium cut polish to achieve a flawless and glassy finish. Here’s a detailed explanation of Step I:

- Select a Medium Cut Polish: Choose a medium cut polish specifically designed for automotive applications. This type of polish contains fine abrasives that help remove light imperfections, oxidation, and enhance the shine of the paintwork.
- Apply the Medium Cut Polish: Apply a small amount of the medium cut polish onto a clean, soft cloth or a buffing pad. Use a polishing machine or work by hand, depending on your preference and the size of the area you’re working on.
- Buffing Technique: Start buffing the surface with the medium cut polish using gentle pressure. Work in small sections, moving the polishing pad or cloth in circular or back-and-forth motions. Ensure even coverage and overlap the areas to avoid inconsistent results. Continue buffing until the polish is evenly applied and begins to create a glossy appearance.
- Inspect the Finish: After buffing, inspect the surface to evaluate the gloss and overall finish. The medium cut polish should have removed any minor imperfections, swirl marks, or haze, leaving a smooth and glassy look to the paintwork.
- Final Touches: If needed, you can repeat the buffing process with the medium cut polish in any areas that require further attention. Be cautious not to over-buff or apply excessive pressure, as it can remove too much clear coat or damage the paint.
By utilizing a medium cut polish and employing proper buffing techniques, you can enhance the shine and achieve a perfect glassy look to the finish. Take your time, work in small sections, and inspect the surface regularly to ensure consistent and satisfactory results.
Step J: Apply a Final Coat of Wax
As the last step in achieving a professional-looking finish, consider applying a few coats of wax to the painted surface. Here’s a detailed explanation of Step J:

- Importance of Wax: Waxing the car provides an additional layer of protection and enhances the overall appearance of the paintwork. It creates a barrier against UV rays, moisture, and contaminants, while also giving the surface a lustrous shine.
- Selecting the Right Wax: Choose a high-quality automotive wax that is compatible with your car’s paint type and finish. There are various types available, such as paste wax, liquid wax, or spray wax. Follow the manufacturer’s instructions for application.
- Applying the Wax: Start by cleaning the painted surface to remove any dirt or residue. Apply a small amount of wax onto a clean, soft cloth or applicator pad. Work on one section at a time, using circular or back-and-forth motions to spread the wax evenly. Ensure complete coverage and avoid applying excessive wax.
- Drying and Buffing: Allow the wax to dry to a haze, following the recommended drying time provided by the manufacturer. Once the wax has dried, use a clean microfiber cloth to gently buff the surface in circular motions. This step helps to remove any excess wax and further enhance the shine.
- Repeat if Desired: If you want to achieve a deeper shine or additional protection, you can repeat the waxing process by applying additional coats of wax. Be sure to follow the recommended drying time between each coat.
By applying a final coat of wax, you add an extra layer of protection and give your car’s finish a glossy and polished look. Remember to select the appropriate wax, apply it evenly, allow it to dry properly, and buff the surface for a perfect, showroom-worthy appearance.
Conclusion
In conclusion, mastering the art of auto spray painting doesn’t have to be a daunting task. With our detailed step-by-step guide, both beginners and professionals can unlock the secrets to achieving a professional-quality paint job.
Whether you’re looking to enhance your skills or learn insider tips and hacks, our comprehensive resource has you covered.
Don’t miss out on the opportunity to create stunning results and become a skilled painter in just 2 hours or less. Click now to embark on your journey towards mastering auto spray painting!

Vicky Dwaj, Founder and CEO of TrucksEnthusiasts , is an automobile engineer passionate about pickup trucks and accessories. Follow his journey to discover the latest trends in off-road accessories, cars, and truck parts.